Your Complete Guide To Flooring Transition Strips
|
|
Time to read 4 min
 Skip to content
|
|
Time to read 4 min
Imagine your dream space and you likely see vast expanses of beautiful floors all made for your ideal material. For many people, that’s natural hardwood in a light or dark style. The reality is that actually creating a home or commercial space with only one flooring material is nearly impossible. That’s because materials like wood just don’t work in spaces with lots of moisture like the bathroom. They also may not feel as good underfoot as other materials like carpet, even if you use a rug.
You certainly wouldn’t use expensive hardwood in a utility closet or connected garage either. That’s where transition strips come into play. Use this guide to learn more about transition strips and why they’re a must in pretty much every home and commercial space on the planet.
Transition strips serve two main purposes in a residential or commercial space. First, they’re put in place to make navigating from room to room easier. They also provide a visual break between rooms and flooring materials that might otherwise be jarring and less than attractive.
When it comes to safety, transition strips delineate the change between flooring materials, giving you a visual clue about what’s under your feet. This is particularly important when you’re making a transition between types of flooring that have very different thickness and firmness measurements, like carpet and tile, for example.
Transition strips have also come a long way from those old aluminum styles that separated rooms and flooring materials in the past. Today, natural hardwood and laminate styles are very commonly made to match your existing flooring. During custom flooring jobs and installations, a contractor may even use existing material to prepare transition strips for your spaces.
Still trying to get a grasp on transition strips and where you might use them in your residential or commercial space? Here’s a list of common places transition strips are used:
Walk into any home or commercial space and you’ll see at least two types of flooring in a matter of minutes. An average home can easily have three or more different flooring types, ranging from carpet to hardwood to tile or natural stone.
These soft-to-hard transitions are particularly common when going from a living room to the kitchen. Other materials like vinyl might even be present in the bathroom.
All of these different materials require transition strips. Here are some of the most common transitions you’ll see today:
You can use these to connect a number of different types of flooring. A metal mount is typically used along with a T-molding. Carpet strips, hard surface reducers for wood and vinyl and end moldings create a polished, finished-edge look when placed on top.
Vinyl to carpet transitions typically benefit from a vinyl strip that is property chosen to match the design scheme. An aluminum track is typically used beneath the vinyl transition strip to connect the different flooring materials.
Often made from aluminum, these are used between two hard surfaces that are roughly the same height.
Often made from the same wood material as your floor, seam binders are a low-profile option that account for expansion and contraction over time. Some wood transition strips are rolled down to account for height differences between two rooms.
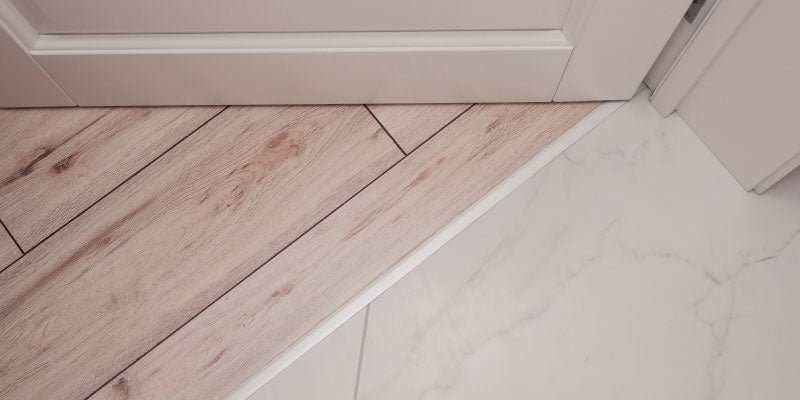
These work to bridge the gap between laminate and tile, which is usually higher due to common installation procedures utilizing cement board. A mounting channel is used in the gap between the flooring materials before a finish molding piece that goes over the top.
These are used to create a step-down between higher tile flooring and lower laminate. The same laminate material as the floor is often used to create a natural uniform look.
Taking on tasks like installing natural hardwood, luxury vinyl plank or laminate flooring can be difficult even if you’re an experienced DIY-enthusiast. Transition strips can be tricky too, but there are some tips to help you if you’re ready to upgrade:
Make sure you wipe any adhesive before finishing your installation. You’ll also want to check that your transition strip is secure and doesn’t move around when you apply pressure. This can damage your floors and create an unsafe transition between areas.
Ready to take on a home renovation project or build a brand new commercial space? Proper transition strips are a must have no matter what flooring materials you’re working with. Our trained representatives can help you find the right products to match your flooring needs.
We can also help you with other home appointments like window and door moldings for your space. Don’t hesitate to reach out to us today so we can help you find the right fittings for your commercial or residential property.
